Mysql Grant Read Only Access to a User
This article provides a complete overview of how to create a new user account in MySQL and grant dissimilar types of privileges on a MySQL database. Learn the basics of user account direction and notice hints.

Introduction
First, let's figure out why we demand users and privileges. When y'all install MySQL Server on your arrangement and create a MySQL database, yous run the required commands in the MySQL beat equally root or administrative user, meaning that y'all take the full power to command every attribute of your database.
However, once you decide to let more than people access and change your MySQL database, you lot need to create users and grant them privileges. By doing so, yous can give permissions or introduce restrictions within the databases or certain database objects. To put it merely, you will decide on who can do what and with what object types.
This article provides insight into how to create a new user and grant appropriate privileges on a MySQL database. But not only that. Yous will as well find out more nigh the creation of custom privileges and larn what types of privileges exist in MySQL. Moreover, you will have extra practice on how to revoke privileges and remove users from MySQL.
Contents
On acme of that, you will have an opportunity to view examples inside MySQL beat out (MySQL command-line client) as well as within dbForge Studio for MySQL, a GUI tool for MySQL and MariaDB database evolution, direction, and administration.
1. Create a new MySQL user business relationship via MySQL Vanquish
2. Grant privileges and add together permissions to user
3. Evidence all MySQL user account privileges
four. Revoke all privileges from user
v. Remove user from MySQL
6. Manage users and privileges via dbForge Studio for MySQL
7. Create a user business relationship via Security Director
viii. Grant and revoke privileges via Security Director
How to Create a New MySQL User Account via MySQL Crush
To get started, you demand to connect to your MySQL Server example and log in as a root user via MySQL command-line interface:
mysql -u root -p When you do, you too need to type the password for the root account and press Enter:
Enter countersign: ******** To create a new MySQL user account via the MySQL crush, you lot demand to execute the CREATE USER statement. Let'south accept a look at its basic syntax:
CREATE USER [IF Not EXISTS] 'new_user_name'@'host_name' IDENTIFIED By 'user_password' In the syntax higher up, replace new_user_name with the proper noun of the new user and host_name with the proper name of the host from which the user connects to the MySQL Server.
Optionally, ready the host_name to 'localhost' if you lot want the user to be able to connect to MySQL Server simply from the localhost, which ways "this computer". If that's not the instance, you can use the remote machine IP address as hostname, for instance:
CREATE USER 'new_user_name'@'10.8.0.5' IDENTIFIED BY 'user_password'; If y'all desire the user to be able to connect from any host, apply the '%' wildcard as host_name.
Finally, set a password for the new user later on the IDENTIFIED By keywords.
Notation that the IF Not EXISTS pick allows to ensure that the same user has not been created before.
Once you lot are done with the new user cosmos, recollect to grant privileges to the user to permit them access the MySQL database. Otherwise, the user volition not have any permissions to reach or manipulate the database in any fashion.
How to Grant Privileges and Add Permissions to User
To provide a user with access to the database and give permissions, you more often than not need to use the following GRANT statement:
GRANT permission_type ON privilege_level TO 'new_user_name'@'host_name'; Although the in a higher place-mentioned syntax is rather basic and doesn't show all subtleties, information technology points to the conclusion that there are multiple types of privileges (or permissions) that can be provided to a new user. Hence, let's illustrate the most mutual types of permissible privileges that can be used for the GRANT and REVOKE statement:
- ALL PRIVILEGES – The user gains all privileges at an access-specified level.
- CREATE – The user gains permission to create databases and tables.
- DROP – The user gains permission to drop databases and tables.
- DELETE – The user gains permission to delete rows from a specific tabular array.
- INSERT – The user gains permission to insert rows into a specific table.
- SELECT – The user gains permission to read a database.
- UPDATE – The user gains permission to update tabular array rows.
Thus, we have clarified what types of permissions exist and defined what to put in the first role of the GRANT command. Now, let's talk almost the second part that follows the ON keyword, namely, the privilege level. By means of the privilege level, you lot can determine which MySQL objects can be manipulated by the user account: all databases, a specified database, specified tables, certain columns, or certain stored routines within a database. In the following paragraph, we will talk most that in greater detail and provide examples.
Grant Privileges on Database to User
To grant all privileges to a user account on all databases via MySQL control prompt, you demand to assign global privileges and employ the *.* syntax after the ON keyword:
GRANT ALL PRIVILEGES ON *.* TO new_user_name@host_name; In this example, the new user is granted the maximum privilege level possible: they gain the permission to read, modify, execute commands and perform whatsoever task across all databases and tables. Be careful as this can compromise your database security and lead to negative consequences.
Instead, you might want to grant limited permissions. For instance, you would similar to allow your new user access merely a certain table within the database:
GRANT ALL PRIVILEGES ON database_name.table_name TO user_name@host_name; In this case, the user is granted tabular array-level privileges, which apply to all columns inside the tabular array. Hence, they proceeds permission to read, edit, and alter the table as required.
However, information technology may also be necessary to restrict such access and give the possibility to perform sure operations within specified database objects.
For case, below, yous tin can see that the user is granted multiple permissions: they have permission to use the SELECT statement across two columns in the database, execute UPDATE on a third column, and run INSERT beyond the quaternary cavalcade within the same database:
GRANT SELECT (column1,column2), UPDATE(column3), INSERT (column4) ON database_name TO user_name@host_name; Just as you are finished providing the database access to the new users, make certain to reload all the privileges by running:
Flush PRIVILEGES; Later on that, your changes will take effect.
Show All MySQL User Business relationship Privileges
To display the privileges granted to MySQL user accounts, you need to utilise the SHOW GRANTS control:
Testify GRANTS FOR user_name@host_name; The output of the control looks similar to the following:
+---------------------------------------------------------------------------+ | Grants for user_name@host_name | +---------------------------------------------------------------------------+ | GRANT USAGE ON *.* TO 'user_name'@'host_name' | | GRANT ALL PRIVILEGES ON `database_name`.* TO 'user_name'@'host_name' | +---------------------------------------------------------------------------+ 2 rows in fix (0.00 sec) Likewise, you can learn more most how to create a list of privileges of MySQL database users.
How to Revoke All Privileges from User
If you need to revoke privileges from the user business relationship on a database, employ the syntax that is similar to the ane you used when granting permissions:
REVOKE permission_type ON privilege_level FROM 'user_name'@'host_name'; So, if y'all, for instance, intend to revoke all permissions from the user on a specific database, use the following:
REVOKE ALL PRIVILEGES ON database_name.* FROM 'user_name'@'host_name'; Remove User from MySQL
If you make up one's mind to remove a MySQL user account, execute the Driblet USER control through the command line:
DROP USER [IF EXISTS] 'user_name'@'host_name' The command higher up volition remove the user business relationship together with all of its privileges.
Manage Users and Privileges via dbForge Studio for MySQL
While it is feasible to manage users and their privileges via a command-line interface of MySQL Server, it is a lot more convenient and secure to attain the same tasks with the assistance of a reliable database assistants tool.
The reason for that is that accurate management of user accounts plays an important part in database security, and since the number of such accounts tin can reach big numbers, it can become difficult for a DBA to accept stable control over them.
Therefore, if you are looking to strengthen your database security and improve administration, you tin can use a professional tool for easy management of MySQL user accounts. dbForge Studio for MySQL is a universal solution for database development, management, and administration that has an integrated Security Manager tool.
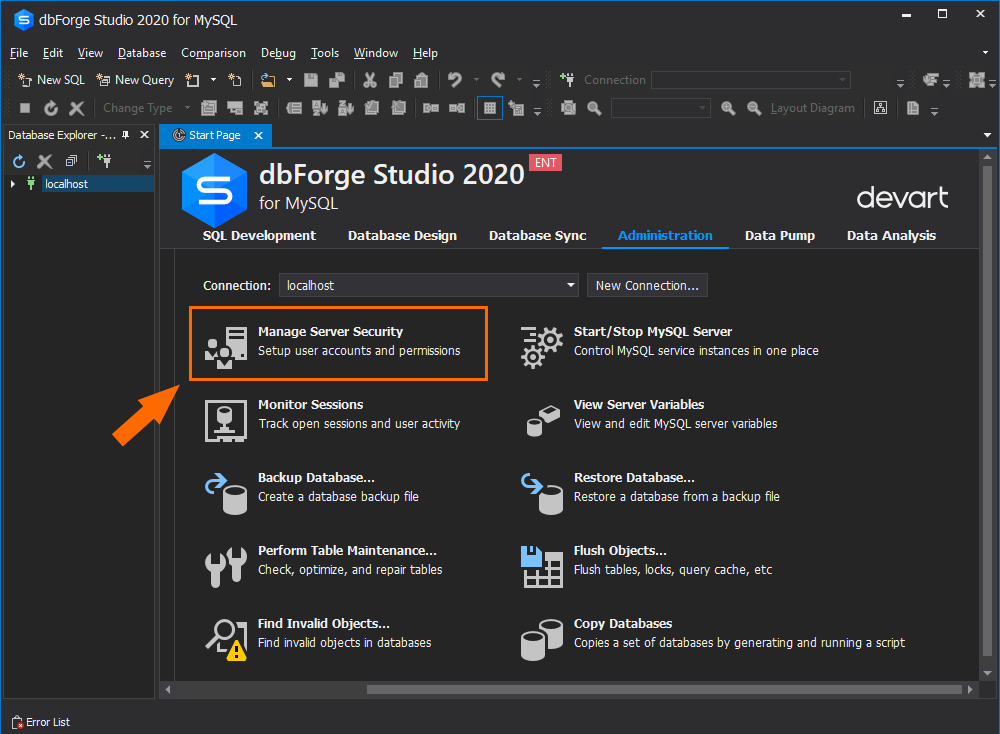
The Security Manager tool is designed to simplify administration and avoid errors. Within a handy graphical interface, you become the possibility to create, edit, and delete user accounts as well as grant or revoke privileges either at global or object levels with but a few clicks. To open Security Manager, go to the Administration tab of the Start page and select Manage Server Security:
After that, the Security Manager window opens. It consists of two parts — the left i displays a listing of all user accounts, and the right one allows you lot to enter and modify the user account'due south data.
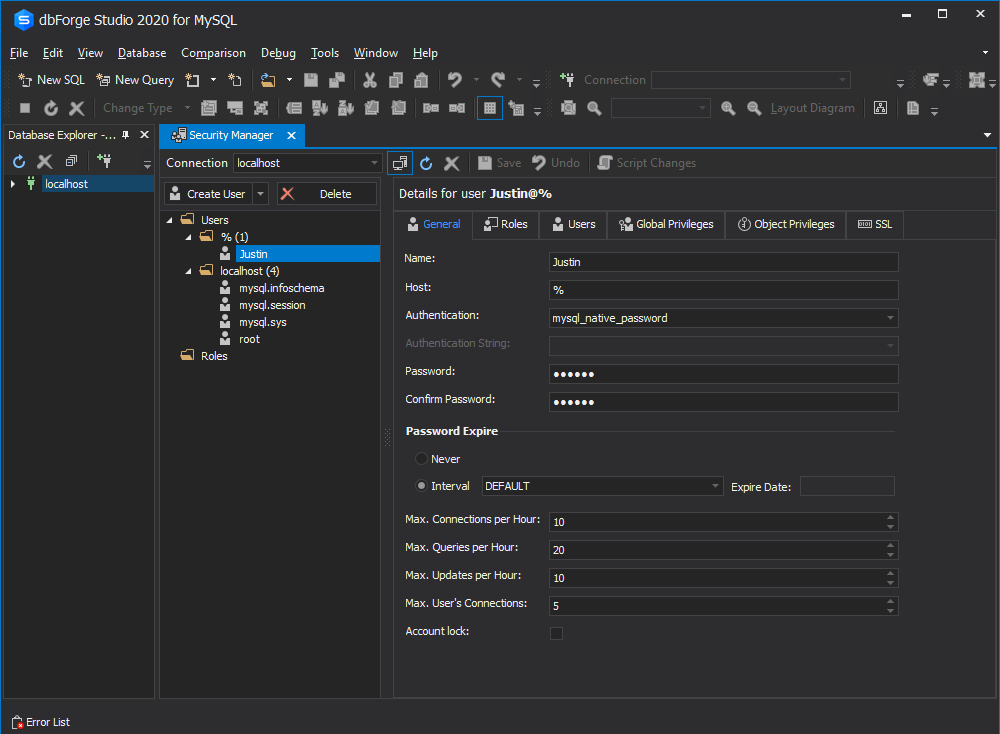
As tin can exist seen above, the user account's data is divided into six groups placed on dissever tabs. They are as follows:
- Full general — contains the proper noun, host, password, the maximum quantity of connections/queries/ updates per hour related to the user business relationship.
- Roles — contains roles that may exist assigned to a user account (this refers to MariaDB connections only).
- Users — allows applying granted privileges of other users to the user account.
- Global Privileges — allows setting global privileges for the user account.
- Object Privileges — allows setting object privileges for the user account.
- SSL – contains SSL-connexion options related to the user business relationship.
Create a User Account via Security Manager
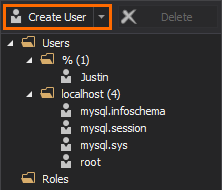
Creating a new user account within Security Manager is as piece of cake equally ABC. Click the Create User button above the listing of user accounts, and immediately start inserting the necessary information and setting options on the corresponding tabs:
On the General tab enter the aforementioned user account parameters into the corresponding fields and click Save on the toolbar. That's all, you tin can now see the newly-created account in the left part of the Security Manager window.
Next time yous need to modify any user's parameters, select the required user in the left office of the Security Director window and effortlessly edit its parameters in the right part.
Grant and Revoke Privileges via Security Manager
With Security Manager, the direction of user accounts becomes time-saving and efficient. Let'southward consider an example. Supposing you would like to grant some global privileges (east.g., Create and Insert) and object ones to the Justin@% user. Instead of going into the details of the GRANT statement and running the control via the control prompt, you lot can simply navigate to the tabs within dbForge Studio for MySQL and select the necessary options.
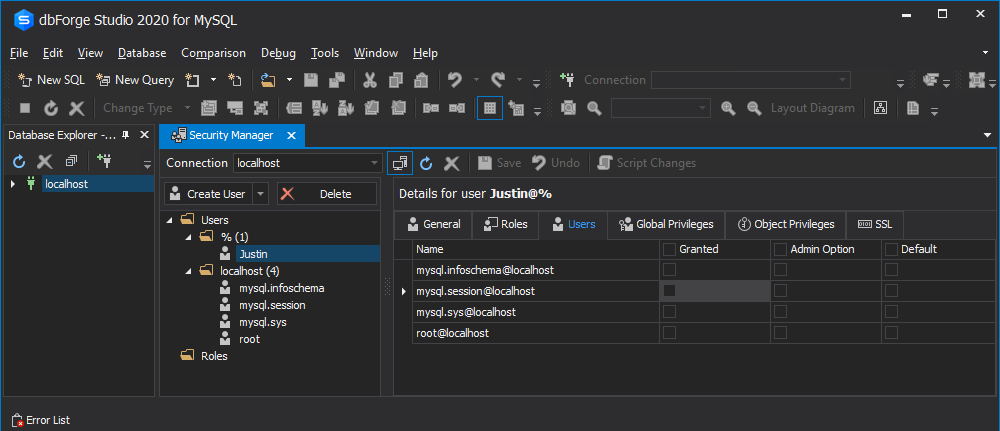
On the Users tab of Security Director, you lot tin cull to employ the privileges granted to other users with a elementary mouse click in the respective checkbox:
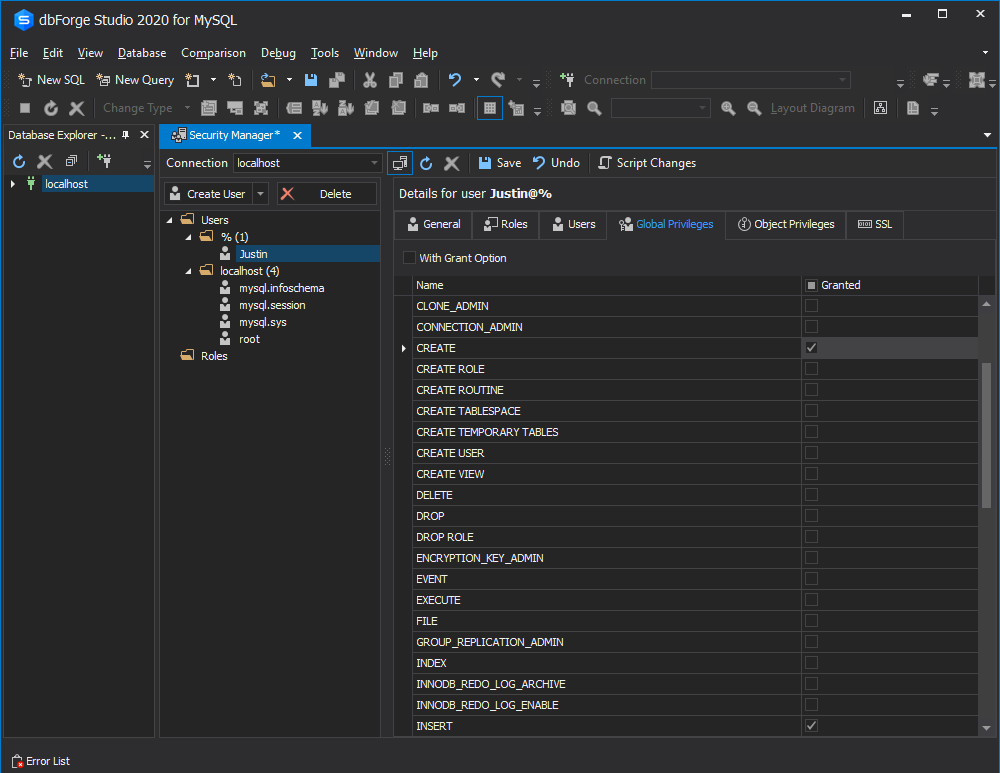
On the Global Privileges tab, select the appropriate checkboxes to grant the required global privileges and articulate the choice to revoke the privileges from the user account. In the example below, we cull to provide the Justin@% user with the CREATE and INSERT privileges that utilise to all databases:
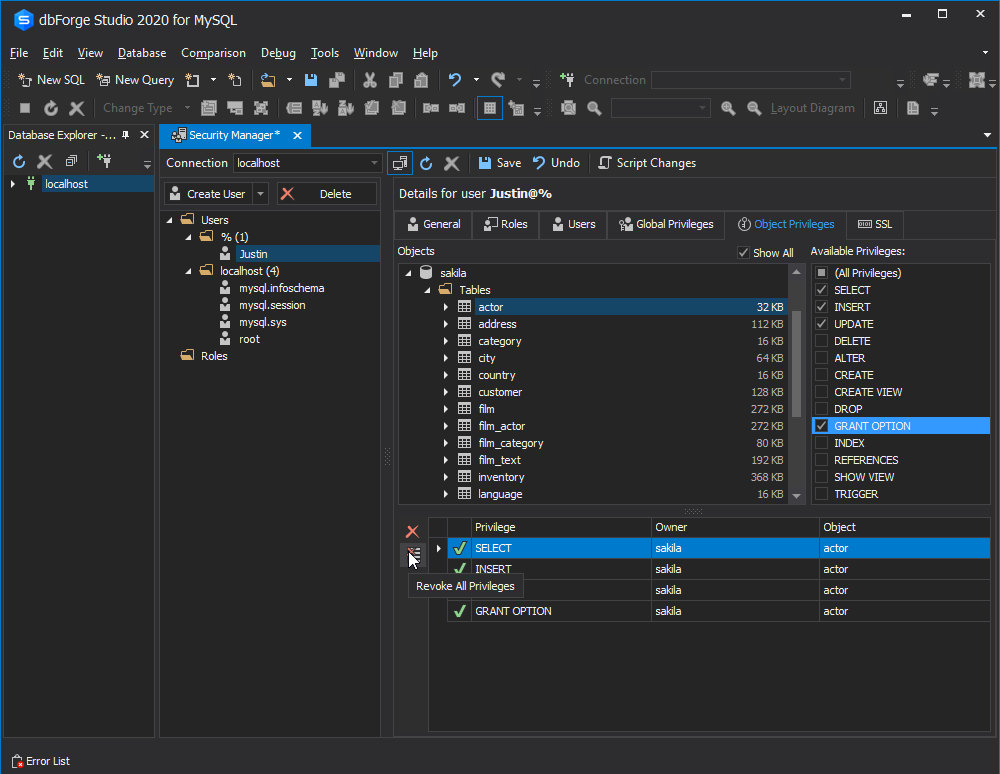
Next, switch to the Object Privileges tab. Here, you tin can grant privileges at the object level. Start, select the necessary schema on the left and aggrandize the schema tree. Select the objects (such as tables, views, etc.) and specify the required privileges by selecting the checkboxes.
At the bottom of the window, y'all can run into a list of object privileges for the current user business relationship. As well, you can click the Cancel icon to revoke the selected privileges or revoke all object privileges.
As you can encounter on the screenshot below, the Justin@% user account obtains permission to run SELECT, INSERT, AND UPDATE scripts across the Actor table. Also, the enabled GRANT OPTION allows the user to grant permissions on this table to other users:
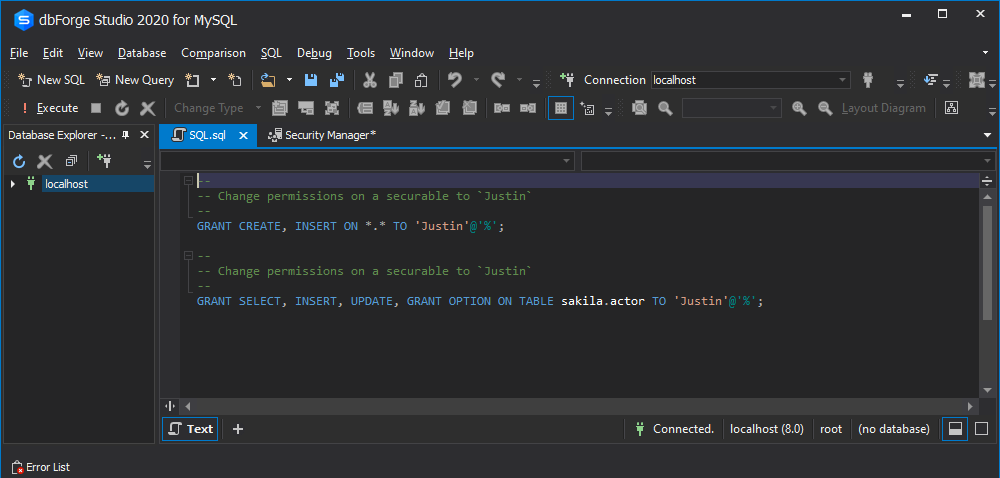
You tin can save the changes immediately past clicking Salvage or preview the script by clicking Script Changes to refresh all the changes in your retentiveness:
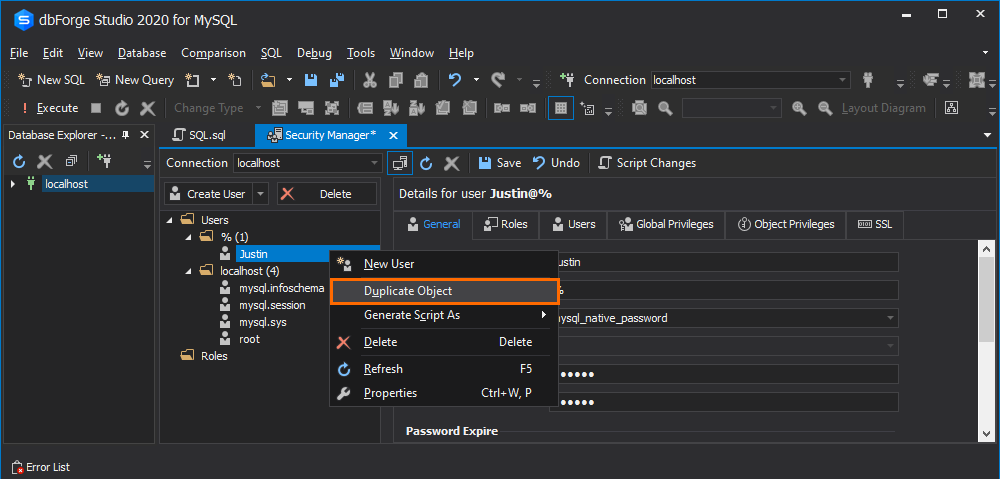
What'south more than, dbForge Studio for MySQL allows you to create a new user based on the existing ane, therefore, saving your time and endeavor. To exercise this, correct-click the user account and select Indistinguishable Object on the shortcut bill of fare:
Determination
To sum up, nosotros have provided a detailed overview of how to best manage users and privileges in MySQL. This information should exist useful for beginners as well as experienced DBA'due south as it contains basic information and useful tips on efficient direction of users' accounts in MySQL databases. Use dbForge Studio for MySQL to bring your database security to a whole new level and significantly boost your database administration. Too, you can sentinel this video tutorial:

- Author
- Contempo Posts
Source: https://blog.devart.com/how-to-create-a-new-user-and-grant-privileges.html
0 Response to "Mysql Grant Read Only Access to a User"
Post a Comment